
Have you recently stumbled across a large collection of old family pictures you have decided to convert into digital photos? Undertaking such an important project can seem daunting, no matter how big or small your photo collection is.
Have you come across terms such as DPI, PPI, JPEG, or TIFF and you’re not entirely sure what they all mean? Questions such as, “What is the best resolution for scanning my photos?”, or, “What is DPI?” may be on your mind. Well, you’ve come to the right place for answers.
At Nostalgic Media, we get more questions about photo scanning resolutions and file formats than anything else. Let’s break things down and give you the information you need to make the best decisions when converting your photos to digital images.
What Is DPI?
DPI stands for dots per inch. DPI is commonly used to measure the resolution of a scanned or printed photo and refers to the number of dots of ink that are laid down on a piece of paper per square inch.
Simply put, the higher the DPI of an image, the higher the resolution (in most cases). For example, an image scanned at 300 DPI will have 300 dots of ink per square inch when printed.
| Printed Media | Resolution (DPI) |
| Photo from a one-hour lab | 200 - 260 dpi |
| Consumer ink jet printer | 150 - 280 dpi |
| Glossy color magazine | 180 - 240 dpi |
| Newspaper | 160 - 200 dpi |
| Large billboard | 12 - 30 dpi |
What Is PPI?
PPI stands for pixels per inch. PPI is commonly used when referring to images on TV screens and computer monitors. PPI is a measure of the number of pixels per square inch on a screen.
What is a pixel? A pixel is simply an individual dot on a screen. The more of these dots that appear within a square inch on a screen, the higher the resolution of that screen. More dots = higher resolution.
| Digital Media | Dimension (pixels) | Resolution (PPI) |
| 40" HDTV | 1920x1080 | 48 ppi |
| 24" monitor | 1920x1080 | 92 ppi |
| 21" monitor | 1920x1080 | 105 ppi |
| Laptop: 15" monitor | 1920x1080 | 141 ppi |
| iPhone 12: 6.1" screen | 2532x1170 | 460 ppi |
Best DPI For Scanning Photos
The best DPI for your photo scanning project depends on what you intend to use the final images for. 300 dpi is a standard benchmark for an excellent print. 200 dpi will still produce a decent image. 150 dpi can be acceptable if you're viewing the print from a few feet away.
Is 300 dpi or 600 dpi better?
If you have 4x6 snapshots, then 300 dpi scans are perfect for simple archiving or printing. You can still print a good-looking 7x10 enlargement. For small wallet-sized pictures, scan at 600 dpi so you can enlarge them and retain more detail. Have a photo of a group of people? 600 dpi will allow you to zoom in and crop.
Slides and negatives are smaller so they should be scanned at a higher dpi rate, anywhere from 1500 to 3000. Better to have too much resolution. You can always go down in size; you can't go up without losing quality.

If you never plan to make enlargements of your scans, stick with 300 DPI
----------
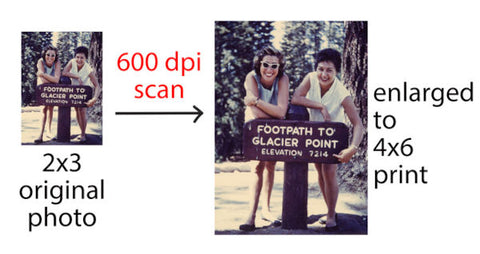
If you expect to enlarge or crop your images, scan your original photos at 600 DPI
----------
Researchers have determined that the average person viewing an image at a distance of 20 inches can only detect about 170 dpi. Most standard inkjet printers usually print anywhere from 120 to 240 dpi.
Prints from a one-hour photo lab are about 220 to 240 dpi. How about a slick fashion or travel magazine? Those pictures can be about 180 to 250 dpi. A billboard viewed from a quarter-mile looks good at 15 dpi. As distance increases, resolution decreases.
Recommended maximum print sizes for scanned media
| Scanned Media | 300 DPI - Excellent | 200 DPI - Good | 150 DPI - Acceptable |
| 4x6 photo: 300 dpi | 4"x6" | 7"x10" | 10"x14" |
| 4x6 photo: 600 dpi | 8"x12" | 13"x20" | 17"x26" |
| 8x10 photo: 600 dpi | 16"x20" | 24"x36" | 32"x40" |
| 35mm slide: 2000 dpi | 7"x10" | 10"x15" | 13"X20" |
| 35mm slide: 4000 dpi | 14"x21" | 20"x30" | 26"x40" |
| 6x6 negative: 3000 dpi | 20"x20" | 30"x30" | 40"x40" |
| 4x5 negative: 2000 dpi | 26"x33" | 40"x50" | 52"x65" |
Best Image Format For Scanning Photos
Two of the most common file types used for scanning old photos are JPEG (JPG) and TIFF. Each format comes with its own set of pros and cons that we will examine below. Deciding on the best format for your scanning project will again depend on what you intend to use the final scanned images for.
JPEG (.jpeg/.jpg)
JPEG is an acronym for the Joint Photographic Experts Group which designed the format in 1992. JPEG files are the most widely used digital image format across the internet thanks to their balance between file size and image quality. The vast majority of digital cameras and smartphones have JPEG files as the default image format.
- JPEG files can easily be shared and viewed on nearly all digital devices.
- Lossy compression allows for smaller file sizes, enabling you to save a larger number of files while using less hard drive space.
- Lossy compression can result in some detail loss
- Not ideal for images with lots of text or sharp lines/edges
TIFF (.tiff)
TIFF stands for Tag Image File Format. The format was first created by the Aldus Corporation in the 1980s for use in desktop publishing. TIFFs are great for storing high-quality images and are popular amongst graphic designers and professional photographers, thanks to their lossless form of file compression.
- Lossless compression means greater retention of detail, image data, and overall image quality
- Great for editing images down to precise details
- Extremely large file sizes compared to JPEGs, requiring more of your limited hard drive space
- Cannot always be opened on common digital devices; often requires special software.
- Difficult to share with friends and family through social media thanks to much larger file sizes
So, which should you choose? JPEG or TIFF?
In the vast majority of cases, JPEG is sufficient. If your main goal is simply to archive your photo collection for safekeeping, go with JPEG. If you need the option of manipulating your images or have plans for large-sized printing, go with TIFF.
Converting a lifetime of family photos to digital can quickly become a difficult and time-consuming process. At Nostalgic Media, we do all the hard work for you, and at affordable prices. Since 1989, we have helped countless families convert their aging photos to digital for future generations to cherish and enjoy. Contact us today for more information on how our professional photo scanning services can help you preserve your family's precious photographic memories.